Tuesday, March 3, 2015

I'm not dead, yet....

Ugh, more than a year since my last entry. I do have an excuse however! Perhaps not a good one, but an excuse nonetheless.

Pretty much all my Fab Shop work has ceased due to a major renovation project. My wife's parents left us a lovely house on the shores of beautiful Bear Lake out here in Utah when they passed. We've been taking care of it for them for the last five or six years, and it's been like being in a time capsule. Every time we came up to the house it brought back wonderful memories of her folks, and I think this is just what she needed at the time.

In the last few years she began hinting that it might be time to make some changes, and make the place our own. On the other hand, neither of use wanted to lose the sense of nostalgia that the house has for both of us. Together we laid out a plan to update the house tructurally and rearrange the floorplan to make the house more liveable, but to also preserve the soul of the house so that we wouldn't lose the memories we made there with our folks and our children. We're now just about done. I'll post some before and after photos in my next entry.

Guns - very large guns

My son is a big Destiny fan. He recently sent me a link to the Destiny STL Generator, which is a cool site that lets you create STL files from any of the game's item models. I had already found a 3D model of the Mk 44 Duke Hand Cannon, and he asked me if I would print him a copy of the Thorn pistol from the game. Challenge accepted! I tinkered with the models a bit to slice them into printable pieces (the original models don't accommodate very well). Then I printed them out:


The Duke Mk 44 Hand Cannon

 The Duke alongside the much larger Thorn

I'm in the process of doing the prep work to turn them into master models for molding and reproduction. I'll post some photos of the finished replicas soon.

On a final note, Colossus got another upgrade! I've added a second extruder to enable me to print in multiple colors or to use water soluble PVA for skirt and support material. Here he is now:


The Makergear folks have done a wonderful job with the second extruder, although I'm still experimenting with the gcode to get wipes and tool changes just right.


Thursday, February 13, 2014

Colossus does Crossfit...

For the past couple of years I've been doing Crossfit with my lovely bride. I suppose it's my forlorn attempt to slow my descent into decrepitude. In any case, I can do things now that I couldn't at 30, so it must be doing something good for me.

I work out at Ute Crossfit Sugarhouse. As a warm up we use a gadget called Iron Scap, a set of elastic bands that is used to mobilize and warm up the shoulders and shoulder girdle.


The handles look like this:


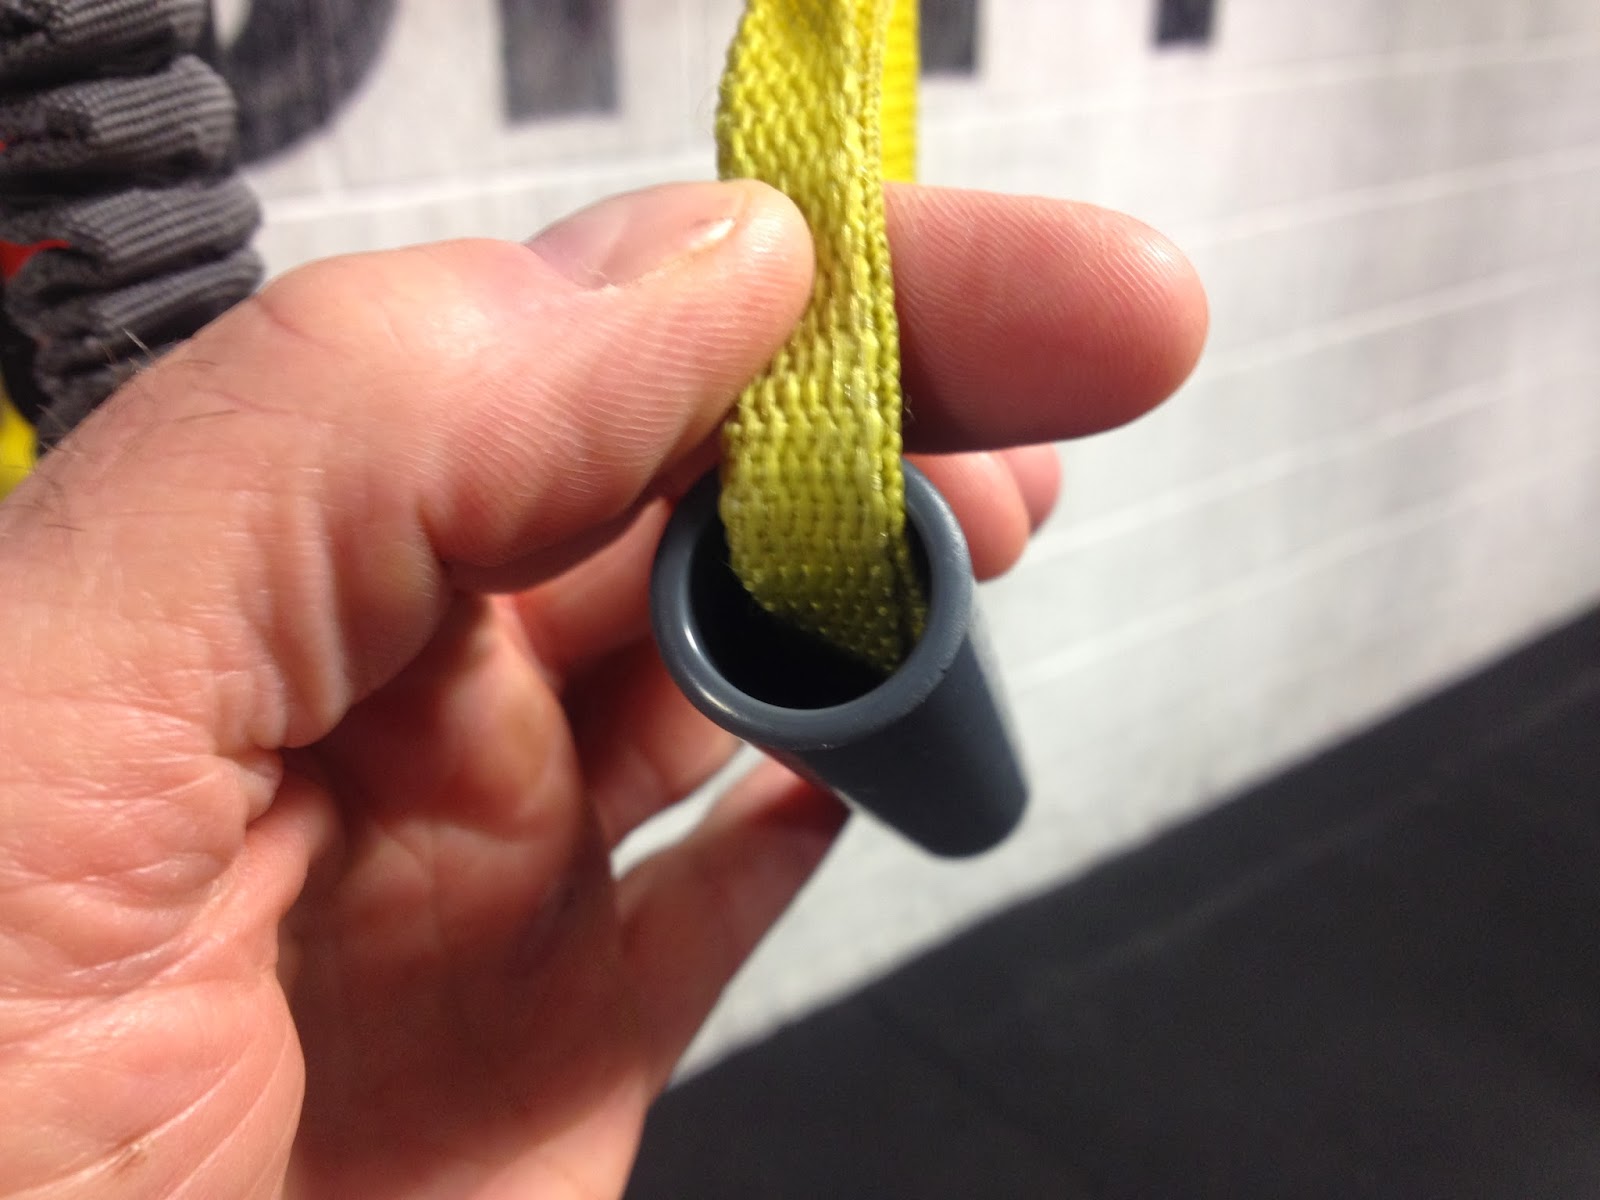
They are made from ABS plastic pipe sections. Over time, several of them have fatigued and broken. Replacing them is pretty much impossible, a neat case of planned obsolescence I imagine.

Colossus to the rescue! The only tricky part was designing a tube with an opening the webbing would slide through going in, but not going out. I realized that by rotating the slot along the tube about 30 degrees, the lip offset would keep the webbing from sliding out accidentally. Like so:


One quick print later, a prototype was born:


And it works like a charm. The next set will be slightly larger to match the original exactly. Now to contact the Iron Scap folks to try and sell them the idea!

Tuesday, August 6, 2013

Making Elder Lemonade

I recently had the chance to help make a really bad situation a little less bad...

Some of you may be familiar with a recent Kickstarter gone bad - The Doom That Came to Antlantic City. I was a backer of the project, to the tune of $500. If you'd like all the gory details (at least those that are to be had), you can surf over to the page and read the updates and comments. In short, however, the project leader slowly stopped providing useful updates, and after a year, suddenly posted an update stating that the project was cancelled for lack of funds. This project was overfunded by a factor of nearly 4, so the backers are all left wondering where the money went and why absolutely nothing was produced.

Some backers, including myself, wondered how the game's creators (Keith Baker and Lee Moyer) could have allowed this to happen. Keith published a long explanation on his blog, explaining that the project leader Erik Chevalier licensed the game from them. Because of the nature of Kickstarter, they didn't have the relationship that would have existed with a more traditional publisher. At this point then, we are all left waiting for Erik to make clear how the project failed. Essentially, the backers were pretty sure that their money was gone, and that nothing would ever be produced. Ah, but the story doesn't end there....

Keith and Lee, with the rights back in their hands, produced a print and play version of the game. Within a week, they had provided it to the backers for download, What's more, they allowed the backers to give the game away in print and play form. In another surprise development, Cryptozoic Entertainment purchased the rights to the game, and announced that they would be publishing it. They also announced that all the backers would receive copies of the commercial game upon publication at no charge.

Once the print and play was available, I grabbed it and started printing it out. Even in this rudimentary form, the game is really beautiful. As I printed the board and cards, I realized that an essential component was still missing - the plastic playing pieces!


The Doom That Came to Atlantic City (from the PnP Rule Book)

Houses and Resorts I could get by stealing similar pieces from my Monopoly game, but what could I use for the tentacles and cultists? 3D printing to the rescue!

I studied the rule book, and re-created the pieces in Autodesk's 123D Design. A quick export to .STL format, and some test printing to verify size and appearance. Voila! handmade game pieces!
 

3D models of the cultist and tentacle pieces


...and their printed counterparts!
 As a gesture of gratitude for the work put into salvaging something from all of the carnage that was this particular Kickstarter, I sent the first printed set of pieces to the game's designer Keith Baker. Keith, you can put down the zombie clowns now...

The files are publicly available at:


Thanks again to Keith and Lee for making the extra effort to support the folks who backed the game. Thanks also to Cryptozoic Entertainment, for making sure this amazing work will actually see the light of day in commercial form. Thanks also all of you for allowing me to contribute in a small way to making this experience a little less unpleasant!


Wednesday, July 3, 2013

And now for something not completely different...

I ran across a pair of videos that I found completely engrossing, and thought they were worth sharing.

As part of what I do (when I'm not doing what I do for money), I have completed a few sign commissions. They've been relatively simple metal pieces cut with a plasma cutter. As such, they require just a bit of drawing skill and some elbow grease. I don't consider myself an artist, but a tinker. On the other hand, these two short films showcase two art forms that I'd love to learn, but haven't yet.

The first film showcases David Smith, an English sign maker of some renown. David specializes in glass signs in the Victorian mold, and he excels at his craft.


David A Smith - Sign Artist from Danny Cooke on Vimeo.

The second is a short documentary on glass blowing by Bert Haanstra that won the 1959 Oscar in its category (thanks IO9). Glass blowing has been on my bucket list of skills to learn for a few years now, ever since I took a trip to Seattle and toured some of the schools located there. WOW. This film contrasts the art of the blower with the mechanical marvel that is glass production.


Hope you enjoy them as much as I did.

Sunday, June 16, 2013

Rondo!

OK, today we take the next step in creating the Space Marine™Mark VII helmet - Rondo!

I have to admit, when I read that term the first time I was a bit confused. I wondered why you'd pour this

Rondo - Slam it Down!

into a helmet and expect anything good to happen. This unfortunately dates me as a child of the 60s & 70s. Rondo for our purposes today is a combination of fiberglass RESIN and BONDO body putty. The resulting mixture pours easily, but sticks to what it touches, cures relatively rapidly, and forms a nice hard shell.

Here's all my material gathered together and ready to mix:


Presentation is everything

We need:
  • The art object in question
  • A mixing board - I found some cheap poly boards at a local grocery store (6 for $4!)
  • A selection of bondo putty applicators
  • A putty knife for scooping out bondo from the can
  • A mixing cup
  • Bondo repair putty and hardener
  • Fiberglass resin and hardener
Mixing up Rondo is a bit of black magic, as everyone has their own recipe. For this project I mixed:
  •  A baseball size lump of Bondo
  •  3/4 of the Bondo hardener that the instructions call for
  •  3 oz of fiberglass resin
  •  22 drops of resin hardener ( the instructions call for 30 drops - 10 drops per ounce).
The altered hardener ratio is to slow down the catalysis that hardens the bondo and resin, giving me some extra time to coat the inside of the helmet.
 
I mixed the Bondo and hardener, and the mixed the resin and hardener. Finally, I mixed the two together to form the Rondo. The resulting consistency is the thickness of pancake batter. 
 
The Rondo gets poured into the inside of the helmet, and then spread with a rotomolding sort of motion (that means rotating the helmet while tilting it to cover the desired surface).  It took two rounds of Rondo to completely coat the inside of the helmet:


First coat completed

Second coat completed

Between the first and second coats, I plugged up the eye holes and breathing hose holes to minimize any drippy mess like so:

See no Rondo, Hear no Rondo, Spew no Rondo

This stuff cures exothermically, meaning the damn thing gets HOT! It's hard to do, but if you're stubborn or insensitive to painful stimulus, you could burn yourself, so use a little caution when handling the helmet as it's curing. I had about 10 minutes of working time with the mixture listed above, which is just about perfect for this kind of job.

If you're familiar with Shawn Thorrson's blog, you probably know that he likes to be able to do step aerobics on his helmets. While cool and photogenic, it's not something I'm into. One complete coat of Rondo seems to be plenty for this build. So, once this is completely cured and cooled, I'll move onto smoothing the exterior and prepping for the final finish. I'm still dithering about whether to make this a one off, or make a mold helmet and produce clones... Oh well, I'll burn that bridge when I get to it.


Monday, June 3, 2013

At long last, RESIN!

So-

Way back in December I started messing around with Pepakura, specifically helmets from Games Workshop's Space Marine™ universe. After hacking together a Mark III and a Terminator helmet, I finally did it right with the Mark VII:


The other two are perched on my computer room window sill as a testament to my rather pedantic manual dexterity skills.

Finally today, only 6 months later, I finally got around to taking the next step, applying fiberglass resin!

 Mk VII and equipment in ready mode

As I said when I blogged about this the first time, I got sucked into this after stumbling across Shawn Thorsson's blog When My Brain Leaks, the Drops Drip Here. Shawn has a wonderful step by step walkthrough of this process here. I'm going to give you the Reader's Digest version...

In the picture above, you'll see everything you need:
  • Pepakura model, in this case the Mark VII helmet
  • Fiberglass resin with hardener (which is hiding under the white cap)
  • Graduated mixing cup
  • Chip brush. Pro tip - buy the cheap ones, because the resin is really hard on brushes
  • Gloves - you don't want this stuff on your hands. Nitrile gloves are cheap, impervious and  and grippy
  • Wax paper coating the work surface. The resin sticks to everything, and once hard doesn't like to let go. The wax paper will keep you from wrecking your model when you try to pry it off the table.
You'll want to perform this job outside, or in a really well ventilated space. Huffing resin fumes is a great way of killing brain cells.

The process is pretty straightforward. Measure out the amount of resin you'll need. In this case I ended up using about 6 ounces to coat the whole helmet inside and out. Then add the hardener. #M resin asks for 10 drops of hardener to one ounce of resin. Be sure to read the instructions and use the right amount for your resin brand. Too little and it'll never harden right. Too much and you'll have a mixing cup resin popsicle. Mix the resin and the hardener thoroughly, and then brush onto the model.

Some folks do just the inside, some just out. I did both sides because I had enough, and I really wanted to make sure the paper was impregnated. The point of this step is to make the model stiff enough to take the Rondo mixture that comes next without deforming.

The result should look something like this:


See, I told you the hardener was hiding in the cap...

Note the mottled appearance. That's good, as it means the resin is soaking into the paper.

Now it hardens, and puts the lotion on its skin, or it gets the... oops! Wrong blog.

Once it's hardened completely, the next step is to coat the innards with Rondo, a mix of resin and Bondo body putty. So stay tuned for more mess!